Shaping the Dumbbell Retrieve - Open Obedience
Retrieve of a dumbbell is first done in the obedience Open class. Dogs are asked to retrieve on the flat and retrieve over the high jump (see video at end of page).
The exercises in Open and Utility obedience can be fun to train and fun for the dog with the use of play and positive reinforcement. Positive reinforcement denotes both an attitude and a method. We will be using positive reinforcement for teaching the dumbbell retrieve. NO EAR PINCH!!
This positive reinforcement method teaches the dog that they can be successful. It teaches them that if they work and try they can get rewarded and be successful. This method uses progressive shaping to develop reliable behaviors as well as the dog's confidence in the ability to perform them. This method also produces a dog that is willing to try and not be afraid to fail.
Every exercise consists of several skills or criteria that must be learned before moving onto a more advanced skill. There is a logical sequence for developing these criteria. Your job is to understand the criteria of a given exercise and to plan how to develop these criteria in a logical progression.
THERE ARE 5 LESSONS PRESENTED:
LESSON 1: Take the dumbbell when offered by the handler
LESSON 2: Learn to HOLD the dumbbell in dogs mouth (teaching DB duration) until asked to release it to handler
LESSON 3: Teaching the dog how to pick up the dumbbell correctly by the bar
LESSON 4: Teaching the FRONT and FINISH for the dumbbell retrieves
LESSON 5: Increasing the distance for retrieve of the dumbbell. In Open obedience the dog must retrieve the dumbbell from at least 20 feet away from the handler when thrown by the handler. In retrieve over the high jump, the dumbbell must be at least 8 feet away from the jump when thrown.
Thinking About Progressive Shaping of the Dumbbell Retrieve
The dumbbell retrieve on the flat and over the high jump consists of the following skills:
When we shape a a behavior it is very important that we
IMPORTANT: It if very important NOT to ask the dog to do a skill without understanding how to do all the pieces successfully leading up to that skill. For example, we should not throw the dumbbell and ask the dog to retrieve it without first showing them how to hold it, pick it up and carry it. What we are doing is rehearsing incorrect or wrong behavior which in the end is harder to fix or retrain.
In Lesson 1 you will meet Kathy Bray’s Zephyr. Kathy is an excellent trainer and you will see her introduce Zephyr to the dumbbell. He will first learn how to hold the dumbbell with the help resting the hold in Kathy’s hand. Next he will learn how to take it correctly and hold it; then without the assistance of Kathy’s hand he holds the dumbbell on his own. You will also see how I taught Beckett (1 year old) how to hold the dumbbell by first using the chin rest. NO PINCHING OF EARS ever!!!
What is excellent about this video is the tiny pieces that Kathy uses and builds on. Also notice how she is always talking to Zephyr and encouraging him as to how good he is doing and using rewards for his effort. Zephyr learns this very quickly and happily with Kathy’s positive and encouraging training of the dumbbell hold.
REMEMBER: Your job is to understand the criteria of a given exercise and to plan how to develop these criteria in a logical progression. The skills required in the dumbbell retrieve that we will be working on include:
Skill #1: The dog holds the dumbbell in his mouth (duration of dumbbell hold)
Skill #2: The dog holds the dumbbell for longer duration and only releases it when asked by the handler.
Skill #3: The dog will pick up the dumbbell when it is on the ground.
Skill #4: The dog will pick up the dumbbell correctly by the bar.
Skill #5: The dog picks up the dumbbell on the ground and carries it back to the handler from a short distance and holds the dumbbell until the release word is given by the handler.
Skill #6: The dog retrieves the dumbbell, brings it back to the handler and comes into the proper FRONT POSITION. The dog holds the dumbbell until the handler asks him to release it. (VIDEOS TO COME JULY OR AUGUST - TEACHING THE DOG A CORRECT FRONT; ADDING THE DB RETRIEVE AND COMING INTO FRONT)
Skill #7: The dog returns to heel position. (VIDEO TO COME)
NOTE: REFRESHING OF THE DUMBBELL HOLD is critical. Even though my young BC will hold the DB and has duration in our home training area, I have to refresh this skill since it is new. I also do a DB hold at the training field and where I am practicing the DB retrieve.
The exercises in Open and Utility obedience can be fun to train and fun for the dog with the use of play and positive reinforcement. Positive reinforcement denotes both an attitude and a method. We will be using positive reinforcement for teaching the dumbbell retrieve. NO EAR PINCH!!
This positive reinforcement method teaches the dog that they can be successful. It teaches them that if they work and try they can get rewarded and be successful. This method uses progressive shaping to develop reliable behaviors as well as the dog's confidence in the ability to perform them. This method also produces a dog that is willing to try and not be afraid to fail.
Every exercise consists of several skills or criteria that must be learned before moving onto a more advanced skill. There is a logical sequence for developing these criteria. Your job is to understand the criteria of a given exercise and to plan how to develop these criteria in a logical progression.
THERE ARE 5 LESSONS PRESENTED:
LESSON 1: Take the dumbbell when offered by the handler
LESSON 2: Learn to HOLD the dumbbell in dogs mouth (teaching DB duration) until asked to release it to handler
LESSON 3: Teaching the dog how to pick up the dumbbell correctly by the bar
LESSON 4: Teaching the FRONT and FINISH for the dumbbell retrieves
LESSON 5: Increasing the distance for retrieve of the dumbbell. In Open obedience the dog must retrieve the dumbbell from at least 20 feet away from the handler when thrown by the handler. In retrieve over the high jump, the dumbbell must be at least 8 feet away from the jump when thrown.
Thinking About Progressive Shaping of the Dumbbell Retrieve
The dumbbell retrieve on the flat and over the high jump consists of the following skills:
- Dog holds dumbbell in his mouth
- Dog will carry the dumbbell when moving
- Dog picks up the dumbbell by the bar
- Dog does not play with the dumbbell when sent out to retrieve it.
- Dog does not mouth the dumbbell
- Dog carries the dumbbell back to the handler
- Dog moves in a brisk trot or gallop
- Dog returns the dumbbell to front position and holds it until asked to release it
- Dog returns to finish position
- Principle features of retrieve over the high jump are the same except that the dog jumps the high jump without touching the jump to retrieve the dumbbell.
When we shape a a behavior it is very important that we
- Breaking down the exercise or trick into the smallest pieces. We then teach each piece at a time, starting with the first skill - progressive shaping.
- Helping dogs understand the criteria for the skill we are training. Our goal is that they know exactly what want them to do to be correct.
- We introduce this criteria and skill in a positive way and with a positive attitude.
- We help them to be successful.
- We try to avoid letting them perform the skill incorrectly.
- We always praise and reward correct attempts.
- We NEVER reward incorrect behavior. REMEMBER... Positive is NOT permissive.
- We try to avoid negative reinforcers such as “NO”, “WRONG”, “UHHHH”, or doing any body language that indicates we are upset. The dog will soon understand that they only get rewarded for a correct performance. This concept is very very important and will require the trainer to be very aware and mindful of their behavior when training.
- We continue working on a skill until the dog has become successful at it and it is clear they understand the task being asked. When they can perform this task successfully meeting the criteria we identified, we can then move onto another skill. Training is a process of building blocks and progressively shaping the exercise using the criteria for performance.
IMPORTANT: It if very important NOT to ask the dog to do a skill without understanding how to do all the pieces successfully leading up to that skill. For example, we should not throw the dumbbell and ask the dog to retrieve it without first showing them how to hold it, pick it up and carry it. What we are doing is rehearsing incorrect or wrong behavior which in the end is harder to fix or retrain.
In Lesson 1 you will meet Kathy Bray’s Zephyr. Kathy is an excellent trainer and you will see her introduce Zephyr to the dumbbell. He will first learn how to hold the dumbbell with the help resting the hold in Kathy’s hand. Next he will learn how to take it correctly and hold it; then without the assistance of Kathy’s hand he holds the dumbbell on his own. You will also see how I taught Beckett (1 year old) how to hold the dumbbell by first using the chin rest. NO PINCHING OF EARS ever!!!
What is excellent about this video is the tiny pieces that Kathy uses and builds on. Also notice how she is always talking to Zephyr and encouraging him as to how good he is doing and using rewards for his effort. Zephyr learns this very quickly and happily with Kathy’s positive and encouraging training of the dumbbell hold.
REMEMBER: Your job is to understand the criteria of a given exercise and to plan how to develop these criteria in a logical progression. The skills required in the dumbbell retrieve that we will be working on include:
Skill #1: The dog holds the dumbbell in his mouth (duration of dumbbell hold)
Skill #2: The dog holds the dumbbell for longer duration and only releases it when asked by the handler.
Skill #3: The dog will pick up the dumbbell when it is on the ground.
Skill #4: The dog will pick up the dumbbell correctly by the bar.
Skill #5: The dog picks up the dumbbell on the ground and carries it back to the handler from a short distance and holds the dumbbell until the release word is given by the handler.
Skill #6: The dog retrieves the dumbbell, brings it back to the handler and comes into the proper FRONT POSITION. The dog holds the dumbbell until the handler asks him to release it. (VIDEOS TO COME JULY OR AUGUST - TEACHING THE DOG A CORRECT FRONT; ADDING THE DB RETRIEVE AND COMING INTO FRONT)
Skill #7: The dog returns to heel position. (VIDEO TO COME)
NOTE: REFRESHING OF THE DUMBBELL HOLD is critical. Even though my young BC will hold the DB and has duration in our home training area, I have to refresh this skill since it is new. I also do a DB hold at the training field and where I am practicing the DB retrieve.
LESSON 1: TAKE THE DUMBBELL WHEN PRESENTED TO THE DOG.
To help us see how easily and positively this is done without every using an ear pinch, you will meed Kathy Bray’s Zephyr. Kathy is an excellent trainer and you will see her introduce Zephyr to the dumbbell. He will first learn how to hold the dumbbell with the help resting the hold in Kathy’s hand. Next he will learn how to take it correctly and hold it; then without the assistance of Kathy’s hand he holds the dumbbell on his own. When you watch this video see if you can identify Kathy's CRITERIA for performance of the taking of the dumbbell. Notice her progressive shaping.
What is excellent about this video is the tiny pieces that Kathy uses and builds on. Also notice how Kathy is always talking to Zephyr and encouraging him as to how good he is doing and using rewards for his effort. Zephyr learns this very quickly and happily with Kathy’s positive and encouraging attitude and method of training of the dumbbell hold.
The second video is of Kathy's dog happily and correctly taking the dumbbell in their FIRST shaping session. It is important to note that all of Kathy's dogs have done retrieving of objects and are very familiar and comfortable at picking up an object. However, there has never been duration of holding the object or bringing it back to her hand in the past. This will be and is new training. Again, please observe Kathy's timing of rewards and positive reinforcement. Kathy says that Chimes would not have held the dumbbell on a first attempt so she had to give her something she liked such as an elk anther to pick up. If your dog is having trouble with taking an object in his mouth you might first try a wooden dowel, a wooden spoon or a bone.
NEWLY ADDED JUNE 2017: Beckett has been retrieving the DB to me for some time but has no duration holding it when he gets to me (as you saw in video 3 of his obedience work). Thus, I cannot work on his fronts being straight and I should NOT be rewarding him for his DB retrieve when combined with FRONTS that are not straight. Time to break this down into 3 training behaviors:
1. Take the dumbbell when presented
2. Hold the dumbbell until a release word is given (LESSON 2)
3. Use a platform or other training device to separately teach the front.
|
|
|
|
|
|
LESSON 2 (SKILL 2): DURATION OF DUMBBELL HOLD.
STEPS FOR DURATION OF DUMBBELL HOLD: Above you see 3 different videos of how to get your dog to hold the dumbbell in his mouth with duration WITHOUT AN EAR PINCH !
STEP 1: Teach the dog to rest his face in your hand as the 3 videos above show.
STEP 2: Introduce taking the dumbbell from you. HIGH VALUE REWARD each time the dumbbell is taken plus your positive reward marker of "YES" OR A CLICK.
STEP 3: Next have the dog rest his chin in your hand and give him the dumbbell to hold. Your chin rest helps secure the dumbbell from having him drop it.
STEP 4: Once he is taking and holding the dumbbell in the chin rest position... remember to reward and use your positive reward marker (see video of Beckett above) then use the SLOW COOKIE or slowing moving your hand in (See Beckett video above) and reward as he holds the DB and you give your release word. You might want to say, "hold" or "wait, wait".
STEP 5: When the dog is doing steps 1-4 confidently and happily then change from the chin rest position to 1 or 2 finders under his chin. Continue with the slow cookie and moving the treat in while he is holding the DB. By slowing moving his reward in ("slow cookie") he is learning to wait for the reward.
STEP 6: Begin taking your fingers from under his chin. Start by using one finger and then dropping it a few inches
down from under his chin. Continue with the slow cookie reward.
STEP 7: Very quickly you will find that you will not need to use any fingers under his chin. Continue with the slow cookie to reinforce the wait for your release command.
STEP 8: Offer the dumbbell and have him wait for your release word.
STEP 9: Put the dumbbell on the floor, ask him to pick it up and hold for a duration until you ask for the release.
The last video above shows steps 6-9.
__________________________________________________________________________________
LESSON 3: TEACHING THE DOG TO PICK UP THE DUMBBELL CORRECTLY BY THE BAR.
This video shows one way to help the dog learn how to correctly pick up the dumbbell. We will first put the dumbbell on the ground in front of the dog and use a finger to hold down the DB on top of the bell. We then give our command to "take it" and the dog should take the dumbbell correctly. After the dog does this correctly a few times, move your finger to just above the bell but not touching it and give your "take it" command. If the dog takes the dumbbell correctly a few times you can try to not have any fingers touching or near the DB. See video below.
Next, put the dumbbell on its side with the bell facing up. Sometimes the DB will land this way in the ring but it also shows the dog how to take the DB from an angle. Again, place your finger on top of the DB to secure it and give your command to "take it." Once the dog has done this correctly a few times with your finger on the bell, take your finger off and hold it just above the bell incase you need to again secure it if the dog is not taking it correctly. The video shows both of these.
The dog will correctly pick up the dumbbell by the bar when it is on the ground.
For this skill you will NOT throw the DB but merely place it in front of the dog. First begin with the bar facing the dog which will be easier to pick-up by the bar; then put the DB at an angle so the bell is facing the dog. Ask for your "take it".
IMPORTANT: do not worry about a FRONT and FINISH. You should however, require that the dog hold the dumbbell in his mouth until you ask for the release since this was taught in the previous skills. Shaping involves taking one small step at at time. Helping the dog to understand the criteria of correct performance for that step and then building upon each success until the final performance has been attained.
|
|
|
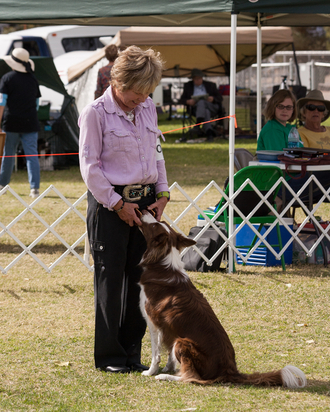
LESSON 4: TEACHING THE FRONT AND FINISH for the dumbbell retrieve
Once the dog can pick up the dumbbell and hold it until you ask for a release, it is ow time to teach a correct front and finish. You do not want the dog to rehearse coming into an incorrect front and finish position. The more they have the opportunity to not do a correct front and finish the more difficult it will be to train a correct front and finish where the dog will not loose valuable points when being scored. I learned this lesson the hard way with my first obedience and OTCH dog, KAFFEE.
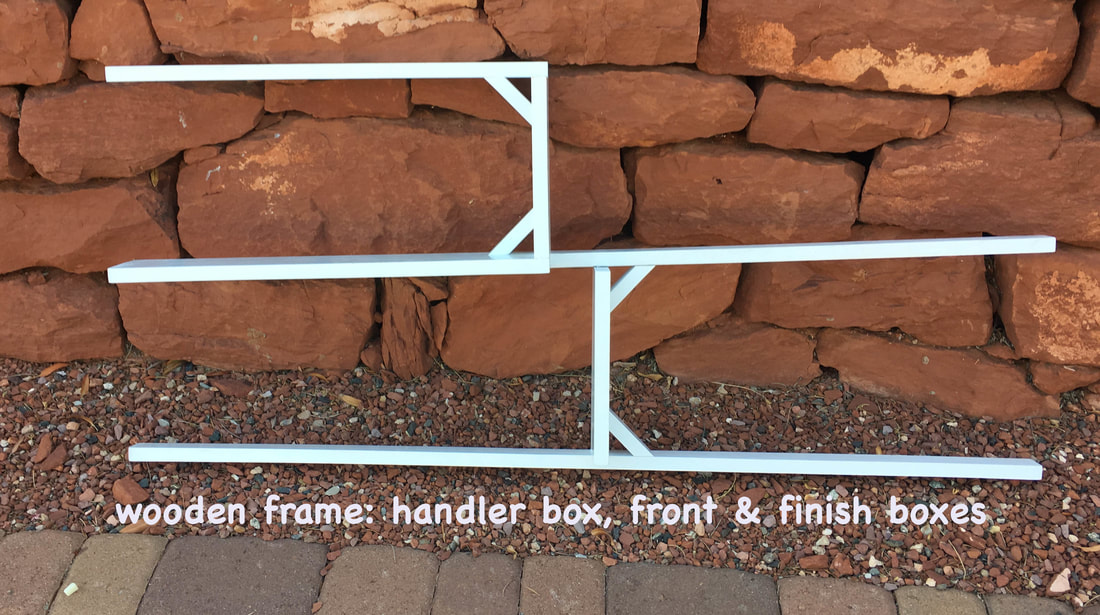
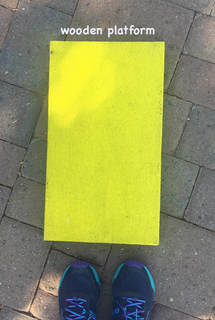
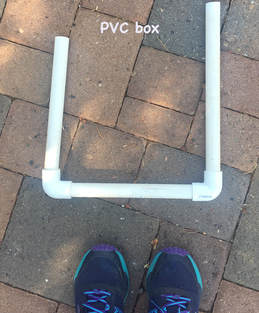
Below are 3 photos of aids that can be used to teach a front.
Once the dog can pick up the dumbbell and hold it until you ask for a release, it is ow time to teach a correct front and finish. You do not want the dog to rehearse coming into an incorrect front and finish position. The more they have the opportunity to not do a correct front and finish the more difficult it will be to train a correct front and finish where the dog will not loose valuable points when being scored. I learned this lesson the hard way with my first obedience and OTCH dog, KAFFEE.
Below are 3 photos of aids that can be used to teach a front.
- Try out all 3 types of front aids or whatever ones you have and see which one gives your dog the most correct FRONT -- WHERE HE IS SITTING STRAIGHT RIGHT IN FRONT OF YOU. I found that the PVC box and the platform did not give me this picture whereas the wooden frame did. The wooden frame did not allow as much opportunity to not sit straight since it was not comfortable to sit on the raised wood.
- Next teach the dog how to come into the box and sit in front of you.
- Once your dog understands how to come into the box for a FRONT from a short distance you can either add distance to the FRONT and/or start adding the dumbbell toss.
|
|
|
|
|
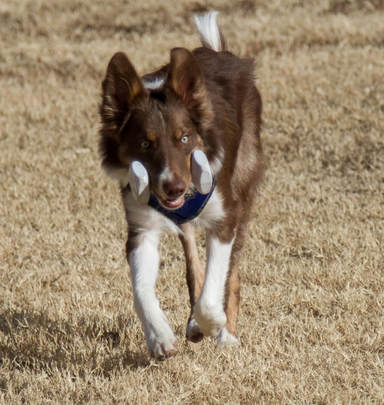
LESSON 5: THE HANDLER THROWS THE DUMBBELL FURTHER AWAY FROM DOG FOR THE RETRIEVE (This may be done on a flexi)
You can see with this step that we are asking much more from the dog by adding distance. We are asking for them to not get distracted as they go out to the dumbbell; to pick up the DB correctly that was tossed and perhaps elicited some excitement in the dog; and finally to carry it in their mouth back to the handler without dropping it. This is a lot to ask yet if we have shaped all the previous steps and not rushed our dogs work and understanding of the correct criteria, they will be ready for this skill.
IMPORTANT: If at any time your dog has problems with the correct pick up and retrieve back to you, it is important to go back to previous skill steps to build a more solid foundation.
Also, DO NOT allow incorrect behavior of any part of this training. This is why we use the leash and flexi so we can immediately stop the dog if they are incorrect. Our goal is to help be as clear as possible in our training so the dog knows what the correct criteria is.
Also, only reward CORRECT BEHAVIOR as the skill criteria stated. If you reward behavior that is partially correct the dog will not learn what the correct criteria is and will be confused. You could then be encouraging incorrect performance in the future.
REMEMBER: Absence of reward lets the dog know they were not correct.
|
|
|
|
|
|
MYST who is currently showing in Utility and working on her UDX demonstrates the RETRIEVE OVER HIGH JUMP IN OPEN OBEDIENCE
Be sure to visit the link to jump training to learn how to get a lovely jump in the obedience ring. Too many dogs studder step and are not confident in their jumping. Bad jumping may cost point deduction.